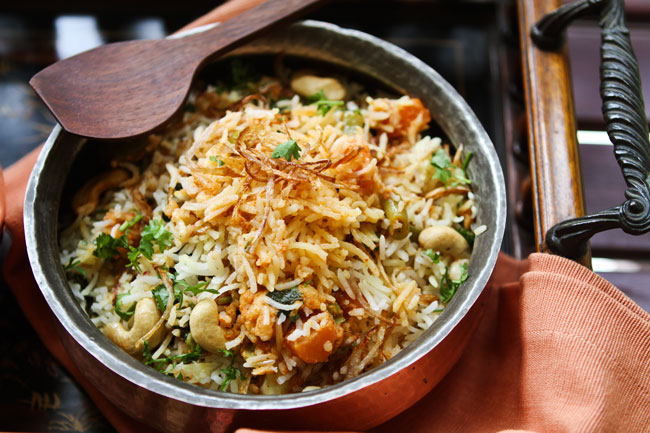
I imagine that 500 years ago Indian emperors ate like this. Steaming hot biryanis straight from the handi (a cooking vessel), scented with cinnamon, safron and nuts and served with a cool minty raita. Mughlai cooking originated in India around the 16th century, during the Mughal empire. Mughlai cuisine is rich and flavorful. It uses nuts, saffron and whole spices like clove and cardamom. Many Mughlai foods are baked in the oven in sealed pots (handi).
I learned how to make this vegetable Mughlai biryani from Veena aunty, a seasoned, passionate cook, and friend of my mother’s. (Have you seen my post on Veena aunty’s out-of-this-world paneer parathas?!) This vegetable Mughlai biryani recipe takes a bit of time. But all the hard work in the kitchen will be well worth the end result – a biryani that is fragrant, flavorful, and filling.
Mughlai Vegetable Biryani Recipe
Serves about 8
For the rice
Ingredients
2 cups long grain basmati rice
2 tablespoons salt
1 tablespoon lemon juice
Method
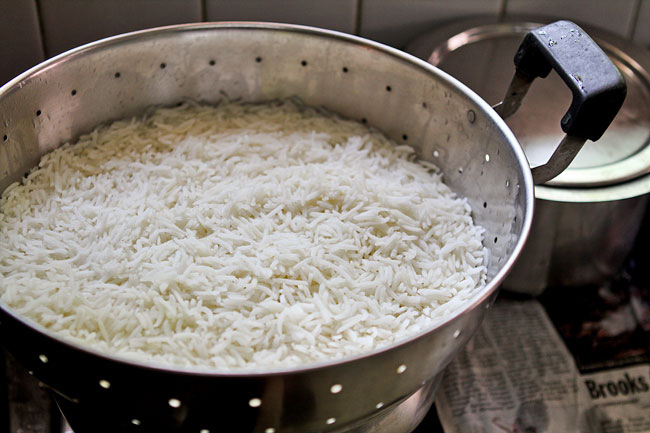
1. Wash and drain the rice. Bring 8 cups of water to a boil in a large saucepan. When the water boils, add the rice, salt and lemon juice. Stir gently. When the water boils again, reduce heat to low. Simmer the rice, uncovered for about 8 minutes, or till the rice is about 3/4th cooked.
The grains must be swollen, but they must still be a little chewy. If the rice is crunchy it needs to cook more. If the rice is soft, you have over cooked it.
Drain the rice in colander. Gently wash it in cold water. Let it drain well. Then spread the rice out on a large platter to cool completely.
For the vegetables
Ingredients
½ cup fresh beans, chopped
½ cup green peas
1 cup carrot, chopped into small cubes
1 cup cauliflower cut into small florets (about 12 small florets)
Method
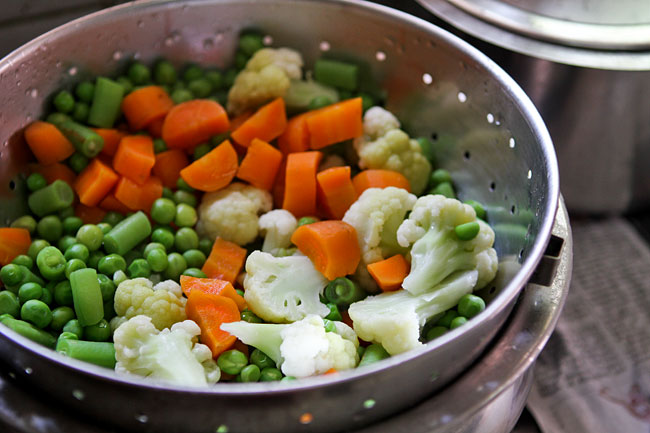
1. Boil plenty of water in a large pan. Add the beans, peas and carrots. Boil for 2 minutes. Add the cauliflower, and boil 2 more minutes. All the vegetables must be a little crunchy and half cooked.
2. Drain the vegetables well, and wash in cold water to stop the cooking process. Drain again and set aside. Alternatively, skip using fresh vegetables altogether and use 3 cups of frozen, thawed mixed vegetables instead (no need to boil in water)
For the masala
Ingredients
1 tablespoon cashewnuts
½ tablespoon khus khus (white poppy seeds)
1 tablespoon fresh grated coconut
1/3 cup vegetable oil
2 small onions grated (about ½ cup when grated)
½ bay leaf
1 thin piece of cinnamon
4 cloves
2 cardamom pods
1 teaspoon ginger paste
1 teaspoon garlic paste
2 medium tomatoes, pureed in a blender
½ cup full fat yogurt
1 teaspoon garam masala
2 teaspoons chili powder
¼ teaspoon cumin powder
For layering
½ cup chopped cilantro leaves
½ cup chopped mint leaves
½ teaspoon saffron dissolved in ½ cup warm milk
2 tablespoons ghee
Method
1. Grind the cashew, khus khus and coconut into a smooth paste, using as little water as possible. Set aside.
2. Heat oil in a large skillet. Add grated onions, and cook on low heat till the onions are brown, about 10 minutes.
3. To the onions, add the bay leaf, cinnamon, cloves, and cardamom. Crank up the heat to medium and stir for about 1 minute or till fragrant.
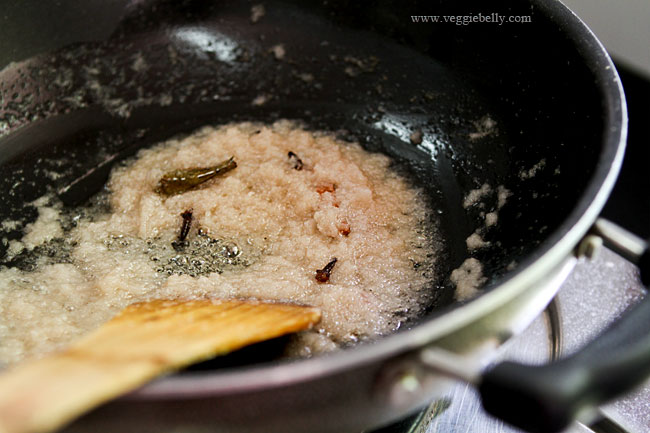
4. Add the ginger and garlic pastes. Stir and let it cook for about 30 seconds.
5. Add the coconut, khus khus, cashew paste. Stir another 30 seconds.
6. Add pureed tomatoes and cook for about 4 minutes. Remove the skillet from the heat.
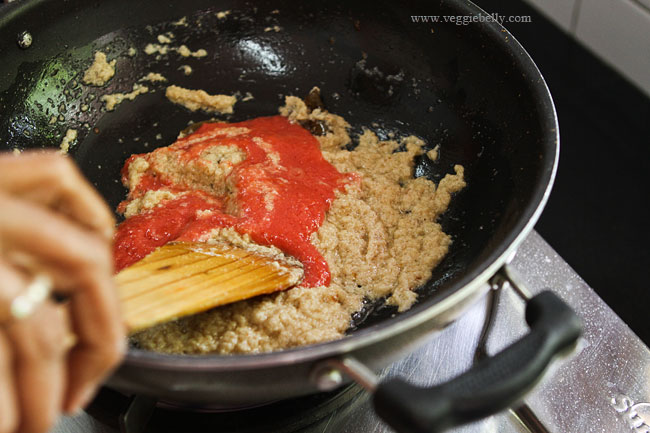
7. Add yogurt and mix well. Moving the skillet away from the heat when adding yogurt will prevent it from curdling.
8. Return the skillet to the stove. Turn heat to low, and add garam masala, chili powder, and cumin powder. Stir for 1 minute.
9. Now add the reserved vegetables and salt. Cook for 10 minutes or till the vegetables are almost done. Add ½ cup water, and simmer another 3-5 minutes.
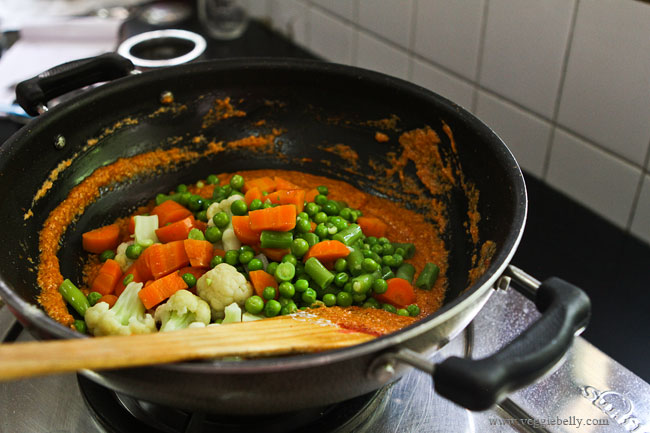
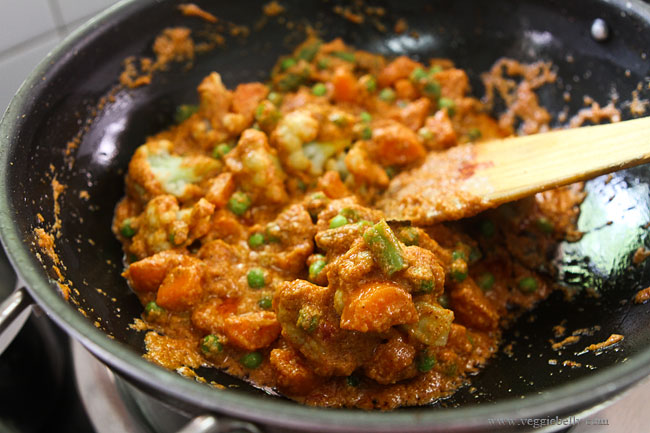
10. Taste the gravy and adjust salt if needed. Remember: this gravy will be spicy, but when you add the rice to it later, everything will balance out.
11. Now you are ready to layer the biryani. Take a large baking dish. Lightly oil the inside.
12. Layer everything in this order – half the rice, half the chopped cilantro, half the chopped mint, all the vegetables and gravy, remaining half of the rice, saffron dissolved in milk, remaining half the cilantro and mint. Drizzle the top with ghee.
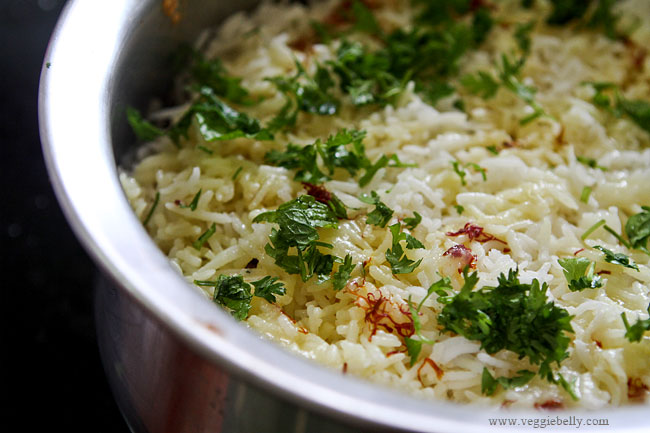
13. Cover the baking dish and bake in a 350f oven for 15 minutes or till the rice is cooked through but not muchy. Turn the oven off, and let the biryani sit in the hot oven another 10 minutes.
If you dont want to bake the biryani in the oven, layer everything as above in a deep saucepan. Cover tightly with a lid, and set it on the stove top. Cook on low heat for about 10-15 minutes or till the rice is cooked through but not mushy.
For topping
Ingredients
2 medium onions
8 cashewnuts
Oil for deep frying
Method
While the biryani is baking, work on the toppings.
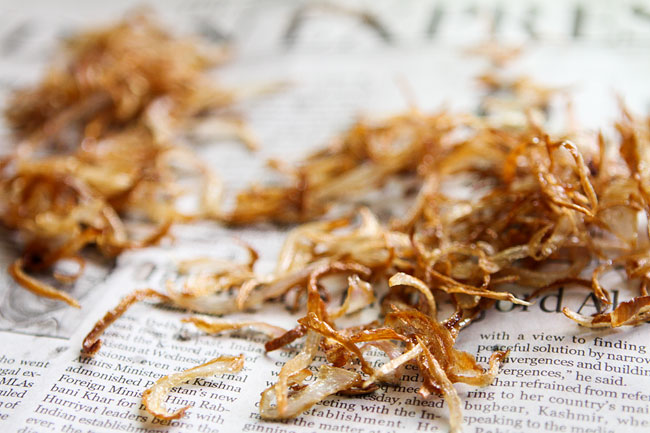
1. Using a mandolin, slice the onions very thinly. If using a knife, make sure the knife is sharp and slice the onions as thinly as you can into strips.
2. Heat oil and deep fry the onion strips, a little at a time. Don’t over crowd the oil. When the onion turns light brown, remove from oil and drain on a paper towel. The fried onion will crisp up as it drains.
3. Then fry the cashewnuts till lightly golden.
4. When the biryani is done, top with the fried onions and cashewnuts.
Serve biryani hot with raita or yogurt.


what a flavorful biryani…definitely going to try this one!
[Reply]
hmmm… looks so yummy!!
when are you inviting me…:)
[Reply]
I always find layered biryanis exotic and fascinating… it’s been so long since i made one and this looks fantastic!
[Reply]
oh man. this is amazing. i have come across a post on this dish for the first time.
i LOVE anything that starts with SHAHI or MUGHLAI – the dish automatically sounds exquisite!
i’m totally recommending this one to my aunt for her next dinner get-together.
i don’t think anyone i know has made (or had) this in recent times.
bookmarking. thanks for sharing, Sala.
[Reply]
A splendid biryani! So mouthwatering and tasty.
Cheers,
Rosa
[Reply]
Gosh this is love Sala!!! I can’t wait to try this ASAP
[Reply]
very meticulously made. loved it am gonna try
[Reply]
I’m definitely trying this out, Mughlai Biriyani never came out right for me. I can see your love for spices and flavor here.
[Reply]
Mouthwatering! Looks so perfect
[Reply]
I went to the store today and got all the ingredients for this today! I’m making it tomorrow. Can’t wait to tell you how it goes!
[Reply]
I am going to try this tonight, it looks wonderful x
[Reply]
Wish i could smell it….biryani is an multi ingredient recipe where aroma, flavor, spice, time and perfection when come together gives you an perfect biryani…i love this Mughali style biryani…..very fragrant and very yum….
[Reply]
Hi Sala, Vegetable Biryani looks amazing! I make a chickpea biryani which is quite similar but love the colours in this recipe. Definitely going to try
You have a fantastic blog with great recipes.
[Reply]
love how that masala looks. i often lack the patience to make a proper biriyani and end up using the pressure cooker!
[Reply]
Hi Sala, I was browsing on internet when your biryani recipe showed up. Now, any biryani is favourite of my family. I like the way you have shown every step with pictures. Very enticing!
[Reply]
Hi ! Followed the recipe to the ‘T’ it was a great hit at home ,the kids have asked to repeat the gravy alone rotis
Thank you !
[Reply]
Sala,
This looks really delicious I am so going to try this over the long weekend.
[Reply]
This looks fantastic. My son is diabetic- do you think this would work with brown basmati rice? Or would the vegetables end up too mushy due to longer cooking time?
[Reply]
Sala @ Veggie Belly Reply:
May 24th, 2012 at 7:10 pm
Brown rice will certainly work. The vegetables shouldn’t get mushy because you will be cooking the rice and veggies separately first.
[Reply]
Hi Sala,
I made the biryani today for lunch. My husband and I loved it. Even made a mint raita to go with it. Great recipe.
[Reply]
Sala @ Veggie Belly Reply:
May 24th, 2012 at 7:11 pm
Glad you both liked it!
[Reply]
Myself and my husband liked it very much. It was heaven.
[Reply]
looks yummy : )
[Reply]
Good recipe. Just tried it out. Thanks for sharing.
[Reply]
Made this on Saturday and it turned out to be so good! I did post a pic on my fb wall and tagged you as well – not sure if you got to see it.
The proportions provided were bang on! Thank you so much!
Just one question though. Will it be just as tasty if I make the veggie+gravy portion the night before? That would reduce my cooking+prep time by half.
[Reply]
Sala @ Veggie Belly Reply:
August 27th, 2012 at 4:36 pm
You can definitely make the gravy ahead of time. You can also freeze it. Glad you liked the recipe!
[Reply]
Hi Sala
We tried your recipe just now and was an instant hit. My wife also liked it! Children want it again & often!! Thanks for every detail you have given.
[Reply]
awesome recipe…it was great…impressed the wife…hahah…
[Reply]
I made this recipe, though I replaced the veggies with cauliflower and paneer. It turned out really delicious, and looked beautiful too. In the future I would add some more cardamom and cloves and cinnamon for extra flavour, to come a little closer to the biryanis I’ve eaten in India.
Thank you!
[Reply]
We recently made this and it was perfect! Best ever.
Thanks
[Reply]
Made this today for lunch, however I cut the chili powder down by half. I must have overcooked the rice since it ended up being more mushy than the one in your picture, however it still tasted fantastic! I will be trying this again to try and make the rice turn out right.
[Reply]
You saved my day. I tried this for a pot luck. It came out great. Thanks for the detailed steps.
[Reply]
Thank You for this awesome recipe! It was a big hit at home.
[Reply]
Hi I made this Biryani over the weekend for my family, they simply loved it and so it I. I’m making it again today for my friend’s potluck..!! I’m sure its going to be a hit.
Thank you for the lovely recipe.
[Reply]
This was fantastic, really loved it. Thanks for sharing. keep posting…..
[Reply]
This is such a flavorful recipe…loved it. Made some yesterday and turned out to be one of the best I’ve ever made:) thanks for a great recipe.
[Reply]
Thank you for the recipe. I am Gujarati living in Barcelona and I made this dish for Catalan people not used to the colour and spice of Indian food. With a combination of fresh Spanish vegetales, the biryani turned out tasty. Muchas gracias. Kartik
[Reply]
This looks awesome… love the step by step images. Bookmarking this, hope to try it some day. Lovely blog you have here.
[Reply]
Made this today. Took two hours but it was absolutely splendid. I had a very happy family. Thank you so very much!
[Reply]
Great recipe and very easy to follow because of the pictures and great descriptions. Thanks for sharing.
[Reply]
Wonderful recipe ! I am a south Indian living in Australia and your recipe made many guests inviting themselves next time too!!!
[Reply]
Your recipe looks fantastic – I’m making it for lunch for friends this weekend. Just one question – how far ahead of time can I make this – eg. Can i prepare it to the layering stage and bake on the day?
xx
[Reply]
Sala @ Veggie Belly Reply:
January 24th, 2013 at 6:04 pm
Yes! You can do this a day ahead.
[Reply]
I made and everyone loved it.
[Reply]
the recipe was so clear that it was like cake walk to cook it. thanks for it. this is the first time I got it the right way to cook it, just coz of your detailed explanation. i owe this delicious lunch to you
[Reply]
Sala @ Veggie Belly Reply:
March 2nd, 2013 at 5:54 am
Happy to hear that! Thanks!
[Reply]
Hi Sala,
Instead of poppy seeds can i use sesame seeds ?? not sure if it will help..
Thanks so much for ur recipe
-Sandhya
[Reply]
Sala @ Veggie Belly Reply:
March 5th, 2013 at 7:08 pm
If you don’t have poppy seeds, just leave them out.
[Reply]
Tried this today. Used onion instead of the cashews becoz i did not have them on hand. Came out very well. Thanks Sala for this excellent recipe.
-Suparna
[Reply]
Hi Sala,
I have tried this recipe for more than 5 times and my family is now a great fan of this biriyani. Thanks for the recipe. However, my top layer of rice always end up being li ‘l crispy as if there’s not enough moisture. I have tried with both oven & stovetop (electric coil range). But, top layer has always been a problem. Wondering how it can be fixed to achieve the fluffy biriyani that I see in your pictures. Let me know if you have any pointers!
Thanks,
Sasi
[Reply]
Sala @ Veggie Belly Reply:
March 22nd, 2013 at 10:33 am
Do you cover the dish before baking?
[Reply]
Sasikala Reply:
March 22nd, 2013 at 9:56 pm
Yea I did..
And, I have tried every possible thing that I could think of .. Tried baking in a pyrex tray in the oven covered with aluminium foil ..tried cooking in a pressure cooker with the lid & weight on.. have tried indirect heating by placing the pressure cooker inside a slightly larger pan… used aluminium foil in addition to the lid in the pressure cooker method…
can’t figure out where I am going wrong ..
[Reply]
Sala @ Veggie Belly Reply:
March 23rd, 2013 at 6:49 pm
Try sprinkling a little water on top of the rice before baking.
HI!
I am going to make this for tomorrow for some guests, and my question is late, so I hope you see it soon:)
YOu had mentioned that you can do this till the layering stage and then continue with the baking the next day, and it should be fine.
So, do I need to refrigerate the layered pan? (I will be baked about 18 hours later)
Also, will the refrigerated biriyani take longer time to bake since it is not at room temp?
Thanks Sala! My cousin made this when he came over and it was so good, that I stole the website from him:)
Aruna
[Reply]
Sala @ Veggie Belly Reply:
March 22nd, 2013 at 10:32 am
Yes, you must cover an refrigerate the biryani if you are making it ahead of time. You may need to allow an extra 5 minutes or so if you are baking the biryani cold.
[Reply]
hi sala! I just discovered your blog and just love the recipes and your pics – they inspire me to cook more indian food This was the first recipe i tried from your blog and it was a big hit at our Easter dinner
 Thx!
Thx!
When I lived in Pune there was a restaurant that made the best beetroot cutlets ever with a crunchy coating (semolina i’m guessing)! I have not found a recipe worthy of it and was wondering if you had one up our sleeve
[Reply]
Dear ma’am,
I am a novice. What is the Difference between Biryani and moghlai(VEG& NONVEG). According to taste and preparation.
[Reply]
Sala @ Veggie Belly Reply:
April 7th, 2013 at 8:38 am
Mughlai biryani is richer and uses nuts and saffron.
[Reply]
i am getting tempted to prepar
e this lavish dish today itself
[Reply]
hv tried this recipe….excellent outcome…
[Reply]
Hi Dear,
My Hunt for a great biriyani recipe ends here. Thank you for sharing this awesome recipe. I love cooking and experimenting in my kitchen. I was looking for a recipe, where I don’t have to use oven while cooking biriyani and this helps. I am going to try this today and will also try this recipe with chicken biriyani. Thanks again!!!
[Reply]
First of all, my compliments on your amazing photos. Beautiful aesthetics. Your passion for food comes through. I am a vegetarian Tamilian in the US myself, and a lot of your faves seem to be mine too (except that I do not like olives. Sorry!). I tried this fantastic biryani and it turned out so well. Made it for a party and got raves. Made a few minor changes (chopped onions fine instead of grating and added saffron while steaming the basmati -which I washed and sauteed before cooking), but followed other instructions and boy, that was some flavorful biryani. Thanks so much. Will definitely be coming back here!
[Reply]
Love it!
[Reply]
Anything made so meticulously warrants a must try. Besides, this looks sooo delicious.. Just what I was looking for..Thanks!
[Reply]
Thanks for this recipe…. Is soaking of basmati rice reqd in your recipe?
[Reply]
Sala @ Veggie Belly Reply:
June 16th, 2013 at 1:58 pm
You don’t have to soak the rice if you don’t have the time/don’t want to
[Reply]
Thanks for this wonderful recipe, a huge hit when I tried. Smells divine, tastes great. Thanks for the detailed instructions
[Reply]
I can’t wait to try this tonight! What if I used fat-free or low-fat yogurt? What would that do?
[Reply]
Sala @ Veggie Belly Reply:
July 11th, 2013 at 2:58 pm
Yes. But remove the pan from the eat before adding low or non fat yogurt because it may curdle if it gets too much heat.
[Reply]
Linda Rosen Reply:
July 13th, 2013 at 6:04 am
Loved your recipe last night, Sala! We will be cooking that again soon, and will try your other recipes too. Thank you for your very helpful website.
[Reply]
vidhya Reply:
May 31st, 2014 at 11:25 am
Awesome recipe.. my husband said best biriyani I have made so far. Only change for me was I had the biriyani in oven for another 15 mins.. maybe I did not seal properly the first 15 mins… Thank u so much for the accurate steps. Very happy.. this is the first time I came across ur site.. gonna check other recipes..well first time I ever comment on any site.. thanks again…
[Reply]
amazingly gr8 recipe…hv tried at home…
tastes so well…..
[Reply]
Great post Sala!
I am gonna try it soon..I need to ask you one thing..Please tell me the microwave settings to be used for baking the biryani..will post you about the outcome..thnxx for the great post..
[Reply]
Hi Sala,
I am a big fan of your website, the recipes, the travel posts, the photos, the presentation…everything. I always thought making dum biryani at home (without a tandoor) was difficult and worthless but your proved me wrong…thanks for the easy yet very flavorful and delicious recipe. I have made it couple of times already and it was great.
Oh btw did you feature in the Madurai episode of Rick Stein’s India on BBC?
Best wishes always!
[Reply]
Delicious recipe. Will try it for sure.
[Reply]
I just happened to come across your website when I was searching for recipies for veg biryani. The manner in which you have written and explained the process is so detailed and perfect. I am definitely going to try this tomorrow. And the photographs are so WOW. Makes you feel hungry just looking at them.
Will surely be visiting your site for more recipies. Thank you so much.
[Reply]
I tried it for a Diwali party at my house and earned numerous compliments for this…the only addition to this recipe was charcoal dum,that added flavor with fragrance….thanks a lot for such a lovely recipe for my vegan frnds.
[Reply]
Thanks a lot for this lovely recipes. First tme i tried thjis recipe and it came out well…
[Reply]
Hi Sala,
Made your recipe for a competetion today..with minor changes like we fried the veggies before bringing to biriyani..and guess what we won..thanks a ton for this beautiful recipe…
[Reply]
Hi Sala,
I tried this recipe for the first time being solo in the kitchen (no mother around to help). It turned out awesome, just missing a little bit of salt. Thanks for a great recipe!
[Reply]
Hi,
I dont know the abcd of cooking but your recipe here made my work easy apart from making my day as well.. It turned out to be delicious. I made this for my lovely wife who loves this briyani and she didnt have words to express as it was my first attempt. Thanks to you.. Your recipe rocks and now is a hit in my In laws place as well
[Reply]
hi. i am so trying this recipe! looks amazing! just had one question.. can i prepare it completely 3 to 4 days ahead.. i have a gathering at my place with guests for 4 to 5 days and will have lots of things on hand.. is it possible to store it in the fridge fora couple of days and then microwave it as and when i need it ? will the taste change or something ?
[Reply]
Sala @ Veggie Belly Reply:
December 16th, 2013 at 7:33 am
Yes, it should be ok.
Another thing you could do is make all the components ahead of time – the vegetable gravy, the par-cooked rice, and the fried onions. Then on the day of serving, just assemble everything and bake it.
[Reply]
I tried this yesterday and it came out awesome… My husband liked it very much…
[Reply]
tried this, came out very well
[Reply]
Hi Sala,
I blogged about this recipe in my blog, have included my pictures, and a link back to your post.
In case you’d like to see: http://sasi-samayal-kurippu.blogspot.com/2014/03/mughlai-biryani.html.
Thank you for sharing such a wonderful recipe, which is our family favorite now!
[Reply]
making this for the nth time ….and drooling over at the thought of making it again this weekend ! this is the BEST Biri yani recipe Ive ever tried. the love for it grows…..god bless you for your passion and patience.
[Reply]
I made this briyani today for lunch with friends…It was amazing..the masala with vegetables to rice ratio was bang on…everything was perfect and we finished it in record time
It was quiet a bit of an effort but very well worth it.Thank you for detailed instructions and recipe.
[Reply]
This biryani was very good. It took me about three and a half hours to make working mostly by myself. The only things I might do differently next time are to make 1.5 times the amount of gravy and use white basmati rice instead of brown (I know white rice is used in the pictures, but I only had brown rice at home).
[Reply]