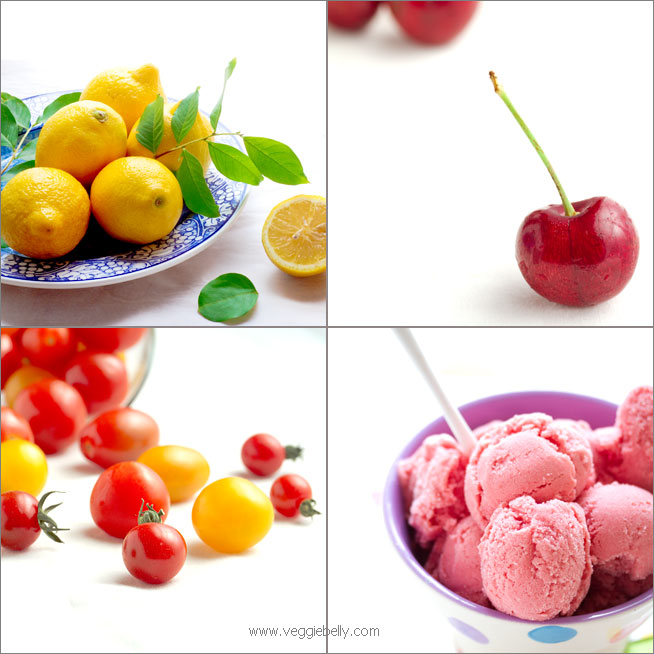
I like taking food pictures on a seamless, bright, pure white background so that they look sunny and clean. “How to take food photos on a white background?” is the one question I get asked the most, so here is my set up and how I do it..
What you’ll need
- The food you are going to photograph
- Background - large white foam board, white bed sheet or table cloth or white card board
- Bounce or reflector – another piece of white foam board, or card board wrapped in aluminum foil
- A camera with manual mode on a tripod. If you dont have a tripod, try using a higher ISO setting.
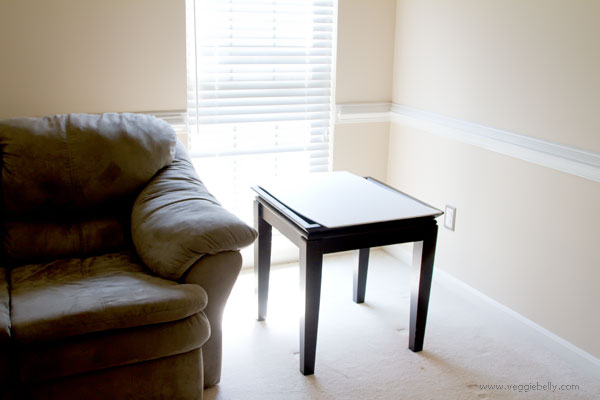
Choose a window with good sun light. This window is in my living room where I get plenty of sun light. I left the blinds closed, because the sun was very sharp, and I got plenty of light for this shot even with the blinds down. Remember, you don’t want direct sunlight falling on your subject.
If you feel the window light is too harsh, drape a white bed sheet over the window to mellow and diffuse the light.
Place a table close to your window. Place a white foam core, white card board or white bed sheet on the table.
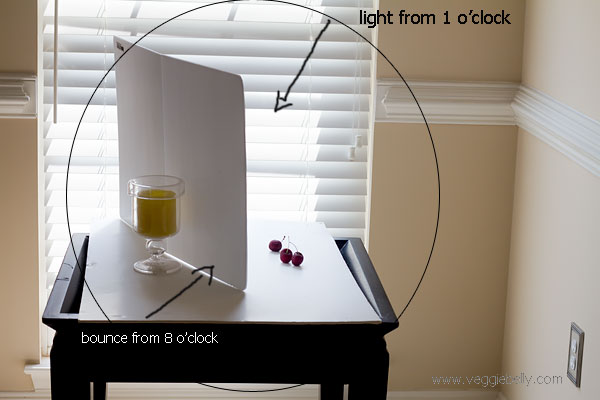
My basic food photography set up with natural light
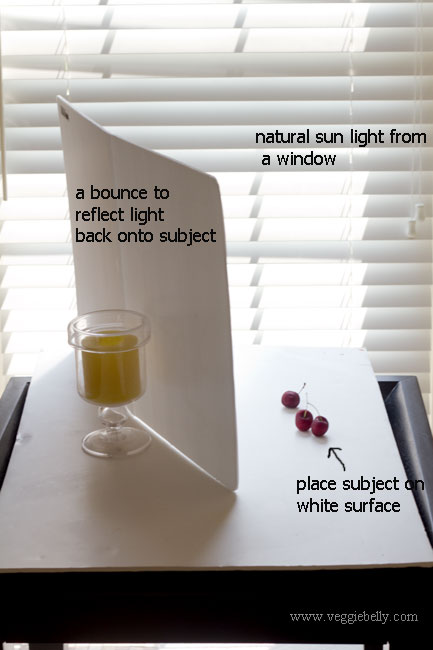
For a seamless white background for you pictures, I use a large white surface. Anything will do – white foam board, or cloth.
A bounce or reflector is just a piece of white material that is used to reflect light back on to the subject. A bounce or reflector will fill any shadows and lighten dark areas on your shot. Use a piece of white foam core or white card board. For a stronger bounce, you could also use a piece of card board that has been wrapped with aluminum foil.
Natural lighting for food photography and light placement
Think of your whole set up as a clock. You are standing with your camera at around 6 o’clock. You want the light coming any where from 9 o ‘clock or 3 o’clock. And the bounce should be on the opposite side of the light. Here, the light source (window) is around 1 o’clock and the bounce is placed at around 8 o’clock.
Now, put your camera in manual mode. Read your camera’s instruction book to learn how to use manual mode; its easier than you think!
For the cherry shots, I picked an aperture setting of f/4 on my canon 50mm 1.8 lens. An aperture setting of f/4 lets me keep the front two cherries sharp and clear while throwing the cherry in the back out of focus.
Keeping the aperture setting constant at f/4, lets try shooting with different shutter speeds. Read your camera manual to see how you can change aperture and shutter speeds.
Exif info for photos below:
lens: Canon 50mm 1.8
aperture: f/4 for all photos
shutter speed: varying; look at pictures below
ISO: 200 for all photos
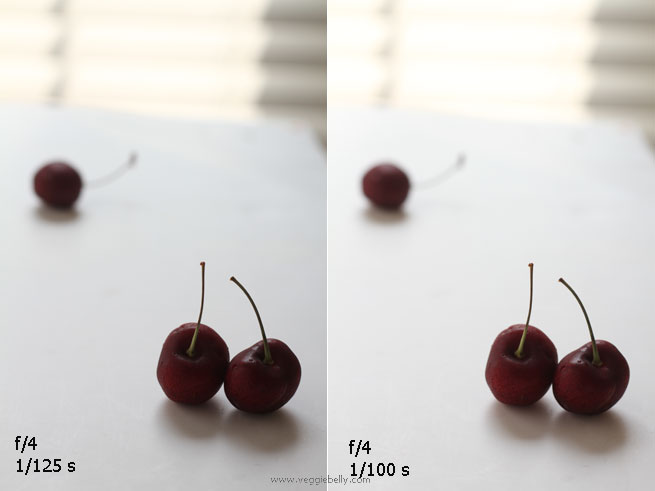
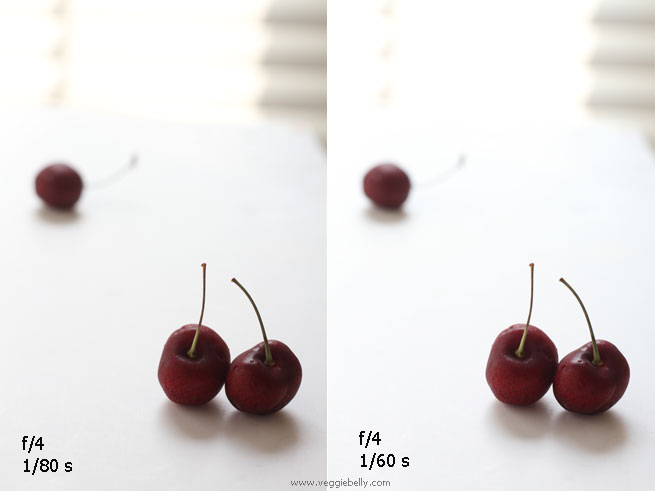
Keeping aperture value at f/4, lets start experimenting with shutter speed. At a shutter speed of 1/125 seconds, there isnt enough light. The picture is dark. Lets reduce shutter speed to 1/100 seconds. A little better, but still dark.
Lets try reducing the shutter speed even more, so that the camera lets more light in. Look at the picture with 1/60 seconds shutter speed. The white background is starting to look nice and bright. But the cherries are still a bit dark.
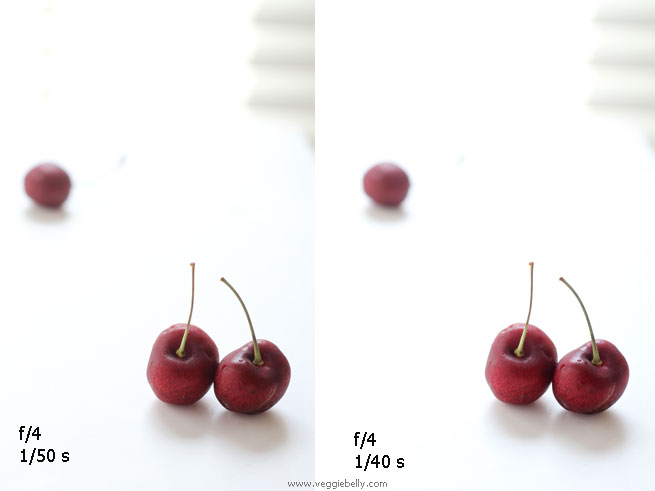
Notice how things are starting to look crisp and bright at 1/50 or 1/40 seconds shutter speed? This is what you want.
But at sutter speed 1/40 seconds, we are entering camera shake territory. Any lower, and my pictures will be shaky. This is where a tripod is useful, to stabilize the shot.
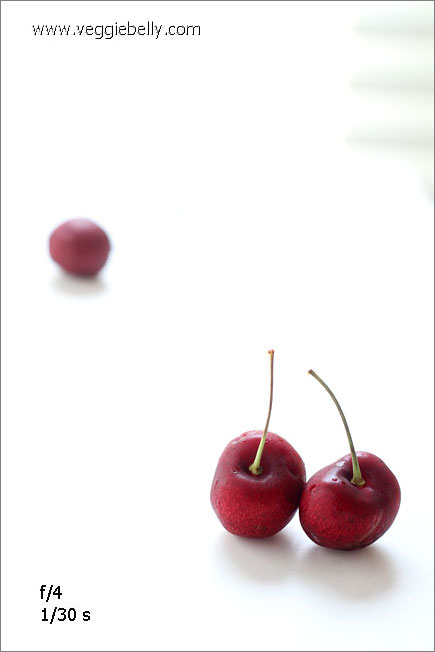
Now you make a creative decision. We have achieved a white enough background. Do you want it even brighter? I did. So I lowered the shutter speed one more increment, to let more light in.
At aperture value f/4 and shutter speed 1/30s I am satisfied with the brightness of the image. How bright or dark you want it is your own creative decision.
More..
- Tips on food photography by Helen of Tartelette
- Learn food photography blog by Neel
- Food photography tutorial series by White on Rice Couple
- Food photography setup on Steamy Kitchen
- Food photography setup series by Wrightfood
- Lara Ferronis ‘still life with’ food photography
Have you tried replicating this shot? If so, share a link to your pictures in the comments section below!

WOnderful post but the only thing for me is the front door faces north and portigo faces south so I really miss bright sunlight..that too if it is cloudy in minneapolis then thats it. But this post of urs is sure reference for me…
[Reply]
Shabs Reply:
August 11th, 2010 at 7:36 pm
Same here….so i too miss the sunlight….
[Reply]
I so need to try this. But I always get stains and smudges on my whiteboard.
[Reply]
Sala @ Veggie Belly Reply:
August 10th, 2010 at 5:17 pm
I do to! All my white boards (and sometimes my camera) have food stuck on them! But they cheap enough that you can throw the stained ones away and buy new white boards
[Reply]
Shabs Reply:
August 11th, 2010 at 11:28 pm
BTW, wher do u get the white boards from?
[Reply]
Very useful post Sala. Thanks a lot. especially about the shutter speed.
Siri
[Reply]
Nice info on food photography sala. I need to find white board.
[Reply]
Sala @ Veggie Belly Reply:
August 10th, 2010 at 5:36 pm
Thanks! Anything white will do. You could even paint a cut up cardboard box white.
[Reply]
Nice Post Sala,
I do the same but barely use the reflector and now I know the difference. I Actually paint my wooden boards and use them. I feel that it kind of gives the background a texture which I like.
Never tried manual mode though. I’m just always scared to do so
[Reply]
A very useful post for me. I still don’t use the manual mode of the camera, neither do I know how to. No white board, no reflector and no tripod. Looks like I have a long way to go No wonder your pictures are magnificent.
[Reply]
Thanks for the post Sala, it was very informative
[Reply]
loved it! very useful
[Reply]
I always look for white background and end up in chart papers…..ur reflecting idea is gud…will try it soon….Thanks for sucha wonderful post…looking for more such posts!
[Reply]
THANK U!!! U make it easy.
I have always been afraid of using the manual mode, but now I will.
Hugs to u girl!
[Reply]
thanks for the tips sala.. your photos are always beautiful.. the white background lets the food be the “hero” of the photo.. love it..
[Reply]
Thanks for stopping by my blog, and thanks for the great photo tutorial! As soon as I get an apartment with sunlight, I’m going to set up some nicer camera shots.
[Reply]
This is a lovely post. I am surely gonna take this as reference and try out I usually used to shoot photos using AV mode. Your photography is absolutely impressive and inspiring
[Reply]
Alka,
Thank you so much for this post. Its really helpful.
[Reply]
Thanks…it is of great help to an otherwise photographer who can not even claim to be in the ranks of amateur photographer – me:)
[Reply]
Very informative post. Tha is how i take pictures these days too. Also int eh living and then to let more light in i pull the curtain to one side and sometimes i see the ppl passing peeing tp se ewhat i am doing. ( we live on the ground floor )
[Reply]
quiet informative thanks a ton for sharing this
[Reply]
Thanks, Its always easy when someone guides you..I always take couple of pictures using different features…which is very time consuming..this will surely help me..Thanks a lot!
[Reply]
Thanks for the great tips!!! I have a simple point and shoot.. Not sure if the same settings are available. I would have to pour over my manual.
[Reply]
wounderfull post,very usefull for me…
[Reply]
Brilliant post. Thank you. Where do you buy a white board from?
[Reply]
Sala @ Veggie Belly Reply:
August 11th, 2010 at 3:01 pm
You can get them in office supply stores, school supply stores and arts&crafts shops. You can also paint a piece of card board white.
[Reply]
This is a fabulous post. I am bookmarking this.
[Reply]
Hi Sala,
Thank you for your food photographic tips. Plz do visit my blog jayzkitchen.blogspot.com,
Jayanthi Sekar
[Reply]
This is a fantastic post Sala. I use cardboard too, but get a bluish tint, now I realise that I really need to fiddle with the camera settings more (I use a point and shoot though) and use a tripod! Thanks so much for sharing your secrets, I really enjoyed the floating cranberry post too.
[Reply]
Thats a great post!!!! Very Useful!!!
[Reply]
Very useful post with detailed tips. Didn’t know abt the reflector usage.
[Reply]
Very good post, Sala! I will follow your suggestions next time I actually get to do a shoot…probably month or two…
[Reply]
Thanks dear,for sharing such wonderful tip
[Reply]
Lovely post Sala..thanks for sharing..:)
[Reply]
Lovely post…. I m still learning… I open my window and off the patio and click pics to get the right brightness…
[Reply]
Thank you thank you and thank you for sharing this very useful information. I have started to use the Manual Mode on my camera now (still learning and playing) and this post answers so mnay of my questions. I cannot tell you in words what a great fan I am of your pictures.
[Reply]
Very informative post…thx for sharing.:)
[Reply]
Very good post Sala. Nicely explained and great examples. Innovative with the clock.
[Reply]
Thanks for the tutorial. Great info!
[Reply]
I checked at my local grocer Tesco’s today for the white board .couldnt spot in stationery section…
[Reply]
Sala @ Veggie Belly Reply:
August 11th, 2010 at 4:25 pm
I doubt tescos or sainsburys will have it. You’ll need to try and office supplies, school supplies or paper goods store. I’m sure you can order online too. But you really dont need specifically a foam board. Any white surface/board will do.
[Reply]
Sandhya Reply:
August 12th, 2010 at 8:13 am
Let me check at Will smiths or an arts and craft store…
thanks pavitra.. we dont have wallmart / target in UK..
[Reply]
pavithra Reply:
August 12th, 2010 at 1:44 am
Sandhya you can see in Micheals, walmart or Target …
[Reply]
Those are really awesome tips – and your photos are so beautiful! Thanks for sharing!
[Reply]
Oh sala…..u are simply awesome…I just discovered the fun of using aperture mode and I am starting to love it….really…But it took me some hell of a time to get a bit of hang on it!…Still loads to learn though….This was the best post on aperture i read so far…..very useful tips explained in the most simplest form even for an amateaur to grasp the idea…….i loved the clock idea, just before u wrote those i was just wondering from which side you shoot your pics….and u then i came across it and thought of it as if u were reading my mind…One more things, did u use the long legged tripod, or the short one that can be kept on table..?Will both work?…And i have a feeling that my shutter speed is automatic in my camera….it changes automatically as i shoot. for eg: It is 1/2500 when i shoot landscapes and then 1/5 – 1/30 or whatever when i shoot the nearer ones.it changes automatically without me doing naything about it.Can this be set to manual as well?…
[Reply]
This is one informative post. Loved reading it.
[Reply]
Brilliant! Thanks for that, you’ve inspired me to improve my food photography. I have to confess, though, that I often just snap the food when it’s finished, as I’m ready to eat!
[Reply]
I have never tried shooting with a white background .. This sounds so much fun ..
I love your photography tips .. A lot of good photographers I knw aren’t even comfortable sharing their photography tips with others. I really appreciate that you are doing this, Sala
[Reply]
This is a very helpful post. I like that you showed a picture that included each of the instrumental pieces in your photos, and the difference in pictures simply from adjusting the shutter speed.
[Reply]
What a simple to understand post ! Thanks for that excellent explanation, will try your way. The clock guide is good ! am gonna follow u
[Reply]
I tried clicking some tomatoes today and I cant tell you how happy I am….Just got what I wanted and have been longing for my pictures….Thank you sala. Will try to send the link when possible.
[Reply]
I have a good idea. How about you fly out to Seattle and just give me a lesson?? I need someone to hold my hand while learning to use my camera. I even bought a manual and I just am not that kind of learner. Thank you though for such a thoughtful post on a difficult subject.
[Reply]
wow!…came to your blog via veda’s link…I am glad to have found another ardent veggie blogger. I am so inspired by your posts..veggie belly is on my blog roll now…
[Reply]
Thanks for the information on this! I have been playing around with some different things, but I have not gotten the results I wanted. I also usually take my pics at night because that’s when there are no kids grabbing at the food! I’ll work on that!
[Reply]
That’s a wonderful post….Bookmarking !!!!
[Reply]
Well done! I shoot with a similar setup sometimes. I think one of the most important things you said, which took me awhile to learn, is the value of having a main light behind and above your subject. Food really looks good with diffuse light streaming over the back of it. I do that even when I’m not shooting on white.
[Reply]
This is god sent…fab post sala…just needed this after getting a new camera and feeling dumb not knowing how to use it…
[Reply]
I never go through all that. No wonder your pictures are stunning each time. Thank you so much for the post. I guess its time to get myself kicking and try what you explained.
[Reply]
Love how easy you make it sound. Can you recommend a good reasonable tripod for the Canon 50D? Thanks a lot.
Deeba / vindee@airtelmail.in
[Reply]
Sala @ Veggie Belly Reply:
August 31st, 2010 at 10:44 am
Hi Deeba, Manfrotto make excellent tripods. Checkout their site, amazon or B&H
[Reply]
The best post I have seen on lighting – you should have named it lighting for dummies
I will be trying out the manual mode – just got a DSLR Nikon S3000 and this was just the incentive I needed to push me there. Thanks!
[Reply]
BRILLIANT!!!
Just what I was looking for.
I only happened upon your site by doing a google on images with a white background.
I’m trying to bootstrap for my new website and this is exactly what I need.
THANK YOU!!!
[Reply]
Wonderful post Sala! It is as if, you have answered the question lurking in my head in the exact manner that I would have wanted. Couldn’t have asked for me. And, you made it sound so simple. Thanks a bunch. Will try this tip for sure.
[Reply]
Radhika Reply:
October 27th, 2010 at 5:40 pm
Sala,
Can’t thank you enough for the photography tips.
Take a look at what I got while trying to follow your instructions.
http://justhomemade.wordpress.com/2010/10/27/homemade-ghee
[Reply]
Incredible site, pictures/photography and recipes. Bravo!
[Reply]
Sala,
This question is a little off the subject.
Do you recommend the use of a camera remote? Do you use one yourself?
Is there anything that I need to keep in mind when looking for one?
[Reply]
Sala @ Veggie Belly Reply:
January 12th, 2011 at 9:06 pm
I usually use a camera remote if my hands are in the shot, and therefore arent free to press the shutter button. I have this one http://www.amazon.com/Canon-Wireless-Control-Digital-Cameras/dp/B00004WCIC/ref=sr_1_3?ie=UTF8&qid=1294884109&sr=8-3
Camera remotes can be either wireless or wired. The wireless one gives you more flexibility to move around, obviously.
I recommend you use a camera remore if you are photographing yourself (like this pic http://www.veggiebelly.com/wp-content/uploads/2010/06/place-omelette-rollup-in-fridge.-picture-from-inside-fridge.jpg), or if you need to be far from the camera, or if you want to avoid camera shake. If not, you probably dont need it.
[Reply]
This is such a great post. I am looking for ways to improve my food photography shots and I will definitely use your tips. Thanks!!!
[Reply]
Brilliant and simple setup! Do you do any post processing at all ? Also what WB is your camera set to?
Thanks for sharing!
[Reply]
Sala @ Veggie Belly Reply:
January 26th, 2011 at 5:10 pm
Yes, i do a bit post processing in photoshop, mainly to adjust exposure and contrast. I shoot in raw, and adjust WB in post processing if needed.
[Reply]
Thanks. Great tutorial. I usually shoot in AM, and am too lazy to try different settings, you gave me inspiration to try shooting in manual!
Thanks.
Sara
[Reply]
Hi Sala… saw them on foodgawker too…
I was revisitng this post of yours after a while and was wondering if you could do a post of photography tips sometime in the near future…
Lovely crisp dosai
[Reply]
Very useful, Now I know how aperture and shutter speed will affect your shot.Keep on posting!!!
[Reply]
Hi sala, first time here, came through soma’s blog, you have a lovely space here and loved the photographs, I use my mobile for my photos, someday when I get hold of a canon , this post would be of a great help, it’s a really wonderful post thank you for this.
[Reply]
wow! interesting post! though I was always scared that the bright light cast glares on my food! should try this out
[Reply]
Hi Sala,
Great to meet you! We’re putting together a list of great resources and we love your post. Can we redirect people to this useful entry? Please let me know!
Cheers
Christine
[Reply]
Gorgeous photos – you’ve sold me on the 50mm f/1.8 lens!
[Reply]
Such a fantastic post! Thank you very much for sharing..I am bookmarking it and will def follow your instructions!
[Reply]
I absolutely love this post! Thank you so much for sharing.
[Reply]
Wow! That was helpful! I’m going to try it! I googled & this was the first thing that came up, I’m definitely going to try. Do you do anything with the ISO? I really don’t know what it is, but I usually adjust mine to 100 when I do white backgrounds. I also use a light box & I do jewelry not food, but it relates.
Thanks!!!
Jne
[Reply]
Sala @ Veggie Belly Reply:
April 4th, 2012 at 3:07 am
If you are working in low light, you can bump up the ISO for brighter pictures.
[Reply]
Wow! This is great! I have been reading so much about food photography, but this is the first article which makes it sound very easy! Can’t wait to try and go ‘click click’

Thank you so much! Keep the photography tips coming in. Would be really helpful
[Reply]
Very useful post, thank you so much!
[Reply]
Very informative post. Thanks for sharing!
[Reply]
Wow, excellent tutorial. I’m new to photography, so this stuff is gold. Probably will need to take a lot of pictures of things on white backgrounds in the near future. Thank you.
[Reply]
Oh, wow! I love this post. I like to write about and take pics of food all the time. Not sure how I started but I love doing it! I never thought about how to take them pro-style! Thanks for the tips! I’m sure I will have a lot of fun trying my hand at white boards. Looks fun and your tutorial made it sound pretty easy!! Thank you so much!!
[Reply]
Very helpful!
[Reply]
You must definitely write a blog titled photography for dummies. Love your explanation and easy to follow and understand instructions. Even professionals fail to explain so. Tip: Well I use lamps that are have huge lamp shades and do most shots at night. With this the amount of light coming from the source is constant. I’m a semi photographer and I liked your way of demo. Well done
[Reply]
I agree with Ash. For someone who enjoys taking pictures I am less inclined to go through volumes of information on how to improve my shots. However this definitely is helpful especially with the Simple, Short and Straightforward illustrations.
Thank you,
TSD.
[Reply]
Which camera are you using. How can do it with my nikon digital camera coolpix?
Thanks!
[Reply]
Awesome technique, beautiful pics
[Reply]
Hey Sala! i m probably one of those last few dullheads who read this post. I just have a question. I shoot food on my dining table and the light comes in from a window to the right. Whenever i try shooting food with a white background in the day light, my food looks either underexposed or over exposed. In short it looks ugly. I use a nikon D5100 with 18mm-55mm lens. I shoot almost all of my food at f/5.6 on A prioirty. Can you help me? Thanks much.
[Reply]
tyty for this quick tip. i been shooting at a shutter speed of 1/60 and i always wonder why my pics look dark…now i know why!
[Reply]
Additional information that will untie your hands: check it out here: http://www.creativityflow.com/2013/11/How-to-make-white-image-background.html
[Reply]